
Are you planning on getting a SOCKS5 subscription, and you want to see if it’s a good protocol for your needs? In this article, we go over the most important SOCKS5 proxy settings, their benefits, use cases, and reasons why you should use them.
I’ll also teach you how to set up a SOCKS5 proxy on mobile and desktop with easy-to-follow steps.
The best thing is that most proxy services use similar settings and work in a similar fashion, which makes it easier to build a one-size-fits-all tutorial.
How to Set Up a SOCKS5 Proxy the Easy Way
The first step in improving your online anonymity is setting up the SOCKS5 proxy (after getting a subscription).
You can install SOCKS5 proxies both on a desktop browser and on a mobile device, and the processes are somewhat similar.
Let me explain:
Desktop Browser Step-by-Step Guide
Installing a SOCKS5 proxy on your desktop browser is easy. Follow the steps below to get a general idea of what you should be doing:
- Open your internet browser
- Go to “Settings” or “Preferences (usually in the top-right corner of the browser window)
- Find the “Advanced” or “Network” option and select it
- Go to the proxy or network settings
- Select “Manual” proxy configuration
- Enter the proxy IP address and the port number that your proxy provider gave you
- Enter your username and password, if necessary
- Save the settings in your browser and then restart it (close and reopen it)
Depending on the browser and your operating system, you may be redirected to your computer’s proxy settings (Windows settings).
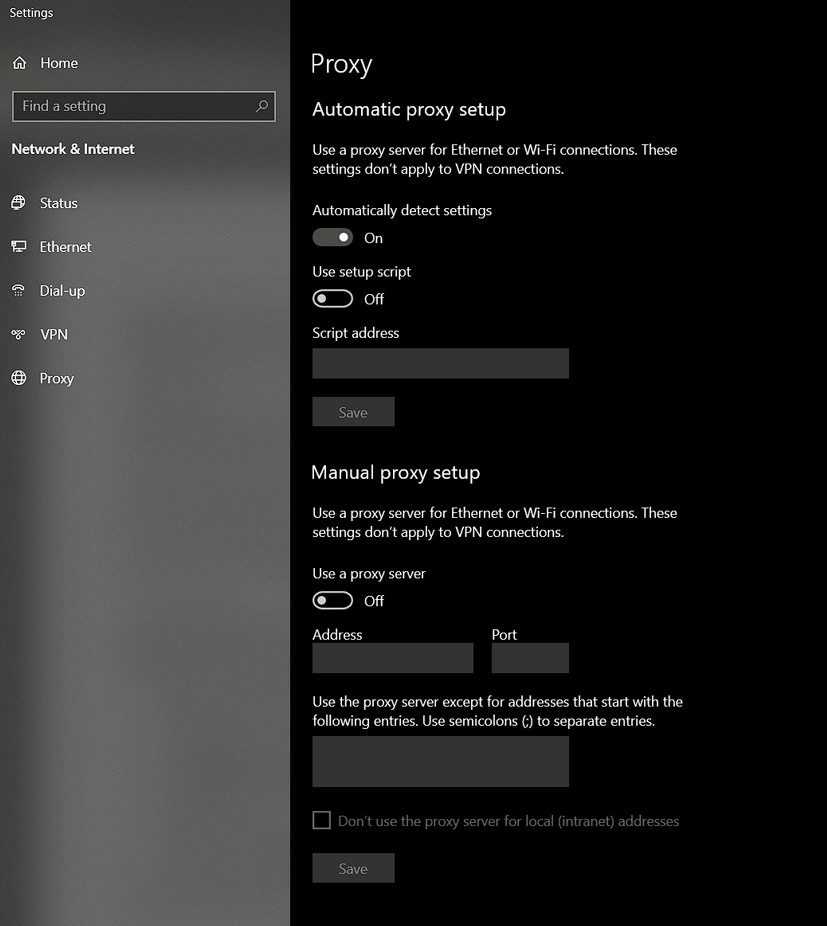
You can see the Windows proxy settings
If you end up here, simply select “Use a proxy server” and then complete the “Address” field with the proxy IP address and the “Port” with your proxy port.
Then, select “Save” at the bottom and restart your browser. You may need to restart your computer, though this isn’t always the case.
Mobile Step-by-Step Guide
Setting up a SOCKS5 proxy on a mobile device is just as easy. Here’s what you do on an Android device:
- Open your phone settings (gear icon)
- Go to “Network & Internet” or “Wi-Fi”
- Select your currently connected Wi-Fi network
- Find the “Proxy” option in the Advanced settings of the network settings
- Select “Manual” proxy configuration
- Enter your proxy IP address and the port number of your proxy provider
- Enter your proxy username and password if necessary
- Save the settings and restart your phone
Depending on the make and model of your phone, the steps may be a bit different, but the overall idea remains.
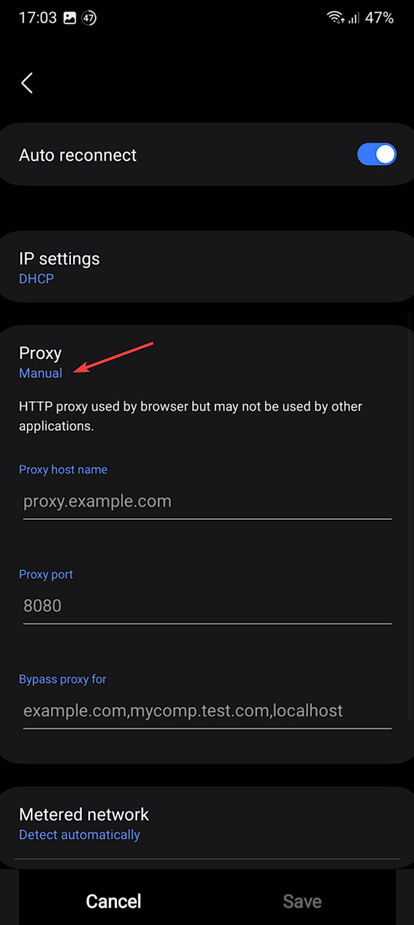
You can see the proxy settings on an Android phone
Once you find your currently connected Wi-Fi network, go to the settings and find the “Proxy” option.
Setting it to manual will reveal several fields. Fill out the fields, save the settings, and you’re done.
And here’s how you enable your proxy on an iPhone:
- Open your phone settings (gear icon)
- Open the Wi-Fi settings
- Select the currently connected Wi-Fi network
- Tap on “Configure Proxy” at the bottom
- Select Manual Proxy Configuration and enter your IP address and port number
- Enter the username and password, if necessary
- Save the settings and reboot your phone
That’s all you need to do to enable your proxy connection on mobile!
Most Important SOCKS5 Proxy Settings
Once you’ve set up the proxy, it’s time to configure it. And this is where the SOCKS5 proxy settings come into play.
But first, you need to determine what you’ll be using the proxy for:
- Data harvesting
- P2P file-sharing (torrenting)
- Marketing campaigns
- Streaming
- Bypassing geo-blocks
Depending on your use case, you use different proxy types and/or configure them differently. Below, I’ll talk about the most important SOCKS5 proxy settings and show you why they’re important.
Proxy Rotation Settings
If you’re using a rotating SOCKS5 proxy, then the first setting you should configure is the rotation. And if you don’t know what to choose between SOCKS5 rotating or static proxies, read our guide on the topic.
The proxy rotation settings will let you set the interval at which you’ll receive a new IP address. Typically, you’re able to select two options:
- Per-Request IP Switch: This will change your proxy IP for every web request you make from the server (like visiting multiple pages on the same website)
- Time-Based Interval IP Switch: This will change your proxy IP every couple of minutes, depending on how often you want your IP to change
Keep in mind that every IP belongs to a different geographical location. So, changing your IP will also change your geolocation.
Even if you select an IP cluster in the same country, services will still see you “changing your location” frequently whenever your IP changes. This only applies if the subsequent requests come from different service providers or across large distances, though.
All of this may lead to blacklisting, which will block your SOCKS5 proxies. Here’s what to do when your SOCKS5 proxies have been blocked.
Benefits
- Enhanced anonymity since it makes it harder for websites to identify you (ideal for web scraping activities)
- Great for circumventing rate-limiting measures during data-scraping activities
- Bypassing geo-restrictions and bans, which may occur from time to time
Authentication Settings
Another important setting you should configure on your SOCKS5 proxies is the authentication method. I’ve talked about this in the guide on 7 mistakes to avoid when choosing SOCKS5 proxies, so you might want to check that out.
Most SOCKS5 proxies will have you choose between username/password authentication and IP authentication. The latter is a bit more secure since it only grants access to specific IP addresses, blacklisting everyone else.
I recommend customizing your authentication settings to increase your security instead of using no authentication. Cases of unauthorized access are quite common, and you wouldn’t want that.
Benefits
- Enhanced security, helping you protect your sensitive data and preventing unauthorized access.
- Better access control, allowing proxy administrators to control who can access the proxy with user credentials.
- Prevents proxy abuse when you’re not the only one using the proxy or if you fear unauthorized access by someone in your team who shouldn’t be using the proxy.
Geo-Location Settings
One of the core features of SOCKS5 proxies is their ability to change your geographical location. Every IP address corresponds to a different location. It could be a different city, state, country, or even another location in the same city.
Depending on whether it’s a datacenter or residential proxy, you’ll appear more or less authentic, and this affects your overall performance depending on what you use the proxy for.
Benefits
- Access to geo-restricted content, like streaming platforms
- Testing and analyses that require different geo-locations, especially in the case of market analysis
- Bypassing censorship imposed by governments or internet service providers
Being able to choose your geo-location is an integral part of SOCKS5 proxies and a core reason why people use these tools.
Log Requests and Responses
The ability to log requests and responses when using SOCKS5 proxies is a somewhat understated feature.
You can log data about requests made by clients to the proxy server and data about the responses received from the destination server. These may include timestamps, headers, metadata, and other information.
Benefits
- Data Retention and Monitoring. If you have data retention policies to adhere to, SOCKS5 proxy logs can help you with that.
- Traffic Analysis. Logs can also help you troubleshoot server issues, identify any potential threats and anomalies, and give you timely insights into traffic patterns
- Compliance with Data Privacy Laws for Inhouse Company Proxies. Logging requests and responses is useful for complying with any privacy and security regulations in your company. By recording user activities and interactions with network resources, you also enforce accountability for your employees
Connection Limits
A lesser-known SOCKS5 proxy setting is the configuration of concurrent connections. By setting a maximum value, you prevent server overloading and ensure that the server operates at maximum performance.
Benefits
- Prevents Server Overload, keeps the latency in check, and avoids server crashes and outages in periods of high activity.
- Avoids Resource Exhaustion. Every connection to a SOCKS5 proxy will consume CPU, memory, and network bandwidth. By limiting the number of concurrent connections, you ensure the proper functionality of the server at all times.
- Mitigates DDoS Attacks. SOCKS5 proxy servers aren’t immune to DDoS attacks, and setting a connection limit acts as a shield against these malicious events.
Automatic Proxy Settings for Inhouse Proxies
Fiddling with all these SOCKS5 proxy settings may seem intimidating, and I agree. And if you don’t need to configure everything to a T, you might want to opt for automatic configurations.
You should find an “Automatic Proxy Configuration” or “Use Automatic Configuration Script” setting somewhere in your proxy settings. Enable that, and you’re ready to surf the internet with optimal proxy settings.
If you don’t have a script, you may have to build it yourself. Think of it this way, though: once you build the script and automate the proxy configuration, you’re set.
Your proxy provider may also give you an automatic configuration URL. Enter it in the appropriate field in your proxy settings to instruct the browser to use those settings for the SOCKS5 proxy.
But remember that these settings may not fit all your needs. For instance, you may need higher rotation settings on data scraping projects to avoid rate-limiting countermeasures.
And that’s when building a script yourself becomes really important!
Troubleshooting
While enabling your SOCKS5 proxy, whether on desktop or mobile, you might come across various issues that need resolving.
Here are some of the more common problems you may encounter:
- Unable to Connect to the Proxy Server
If you get an error saying that you couldn’t connect to the proxy server, you should double-check the server address and the port settings. Make sure there are no typos or extra characters. This happens more often than you think.
Check the network connectivity, as well. And make sure your antivirus or firewall protection isn’t blocking the proxy.
- Slow Performance or Connection Drops
Slow performance might be the most common issue we see with SOCKS5 proxies. To solve it, adjust the timeout settings and check your bandwidth limitations.
In this case, the overconsumption of resources, combined with a lower bandwidth, is the likeliest culprit. You may want to optimize the network configuration or upgrade your hardware if you’re still experiencing connection drops.
- Proxy Server Overload
Peak usage periods, especially if a lot of people are using the proxy at once, may be the cause of your proxy server being frequently overloaded. This is a common practice with many proxy providers.
Try changing your proxy server or, if you’re performing resource-intensive tasks, try implementing load balancing to avoid overloading the servers.
To Summarize
It’s not easy to configure your SOCKS5 proxies, but it’s worth the effort. Plus, you won’t configure the server every day. You do it once, and you forget about it, more or less.
These SOCKS5 proxy settings are the fundamental options you should know about, but the learning process doesn’t stop there. If you’re still undecided about which proxy to choose, read our guide on the pros and cons of SOCKS5 proxies!